(ESTIMATION TIME: 5 MINUTES)
On my session during last SPS Warsaw I showed 5 examples how I save my time by automating things that steal my time almost everyday. In this blog post I’ll show you one of those solution. And that’s not all. I’ll show you how it’s been built so you can build it for your own…or just install my package and save your time!
But firstly sketch shortly the context – is this solution really helpful for me (or you)?
Business card business
If at some point of your career you’ve worked close to business development or you know what networking is all about then probably you already know that business cards are still very popular. Yes, there are apps that support NFC business info exchange but somehow classic paper business cards are still number 1.

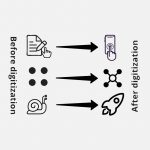
And I agree: business cards are awesome! They look fancy, are easy to share, their size fit into pocket or wallet and if you hit a very unique business card (i.e. made of rare material or fabric) it’s always a good topic to chat during coffee break. However in the end of the day you always end up with a whole pile of those. And the worst part in it is…your workplace! It’s digital. And paper is not compatible with computers (sic!) unless being digitized.
So once after such networking events when I ended up with almost 10 business cards I said to myself that I have to do something with it. I opened one of my favorites productive apps and scanned the first business card from the pile: Capture > Import to > ….only Onenote? Eeee. I opened App Store and briefly look for some business card scanner that could import a business card to outlook. 5 minutes later I decided that actually I have everything I need to relatively quickly and flexibly develop my own business card scanner!
PowerApps and Flow give me flexibility, efficiency and reliability I need. No code solutions with almost a full potential of code solutions. Legit.
Business Card Reader architecture
The architecture of the solution is this:

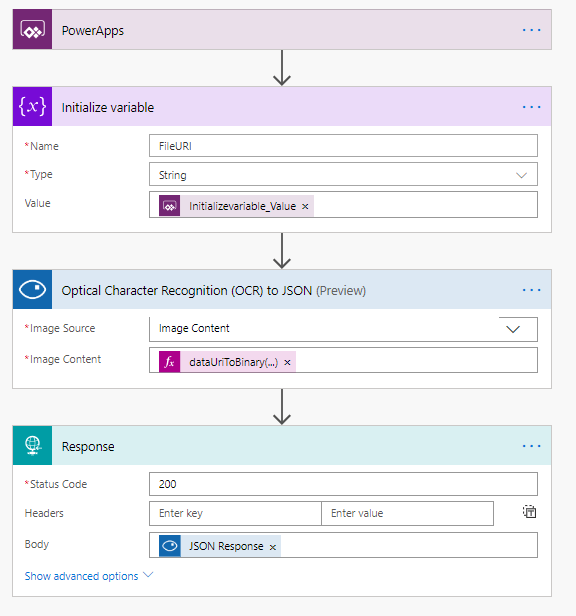
- PowerApps takes photo and passes stream to Flow
- Flow convert photo stream (as URI) to binary and passes it to Cognitive Service Vision OCR
- Cognitive Service Vision OCR is a beautiful blackbox which accepts image content and returns JSON as described here (note that each text is linked to a bounding box coordinates so theoretically you could use this information to highlight text in a picture. Check Paul O’Flaherty great video for reference)
- Flow returns JSON with all recognized strings to PowerApps
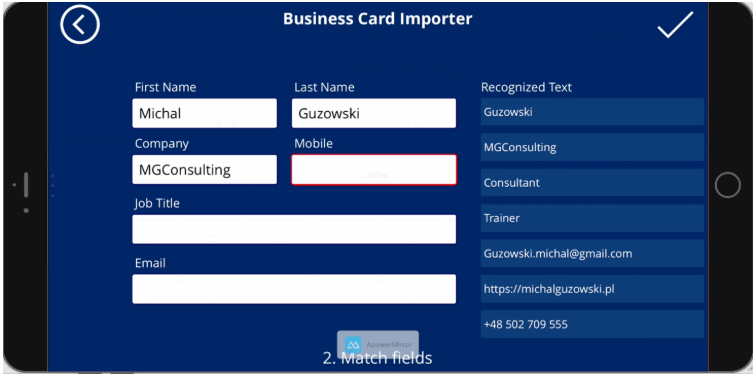
- PowerApps parses results (i.e. joins number values) and waits for a user to match all fields. Once a user done it PowerApps pass fields values to Flow…
- …so it could create new contact in my Outlook contact group
The whole solution works like this

Describing the whole code of the solution wouldn’t make sense (it will be so long that I doubt anyone will read it) but let me put emphasis on some of the most neat constructs in my solution.
PowerApps Business Card OCR Flow Response
Until now I used to use standard PowerApps response from Flow actions. (i.e. I used and described it in this solution which you can also download and play with). But this time I didn’t do that and used HTTP Response action instead.
Thanks to this move I didn’t have to parse JSON results in PowerApps (as I did when I was integrating SharePoint Search results in PowerApps) because PowerApps already was able to interpret such JSON object as Record type. In other words I could save JSON results as record variable (or even a collection if I would) and use it as any other variable. Everything done smoothly, using one, sexy line of code (yes, code can be sexy. The same as math equations).
Set(CapturedRegions,PowerAppsBusinessCardOCR.Run(Image4.Image).regions);Matching recognized strings with fields
This step has been done with an intention to be universal so I could use it not only with business cards but any other OCR use case where matching could/should not been done automatically i.e.: invoice scanning, diploma scanning, sign scanning, random paper text scanning etc.
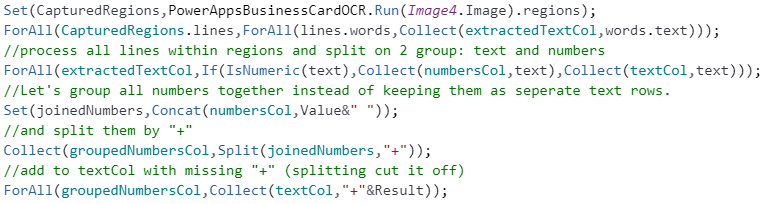
Cognitive Service Vision OCR number parsing
Normally Cognitive Service Vision OCR recognizes number sequences with
white spaced as seperate strings. So what I did is wrote a simple logic which separate numbers from text values, joins numbers together and pushes back to recognized text collection. Code looks like this:
Avoiding code duplication
In matching screen there is a logic which control which variable will be updated once user select an item from recognized text collection gallery. Because this code could be used in multiple places (or at least that was the idea at the beginning) I didn’t want to maintain more than once. So I used a trick which I describe in this post. Long story short the idea looks like this:
- Add a new button and make it invisible
- Put your redundant formula in OnSelect event of the button
- Use Select(YourInvisibleButton) function to execute formula inside OnSelect event of your invisible button
- For any dependencies (you can think of them as the functions arguments) use variables (global or local).
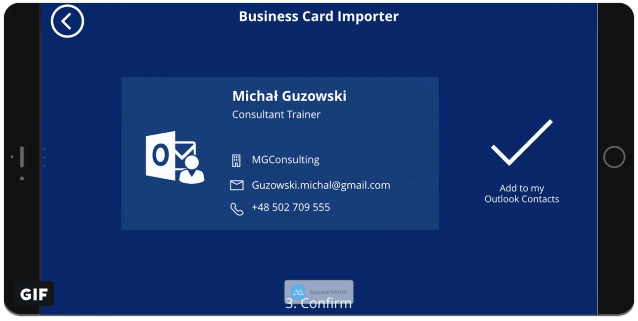
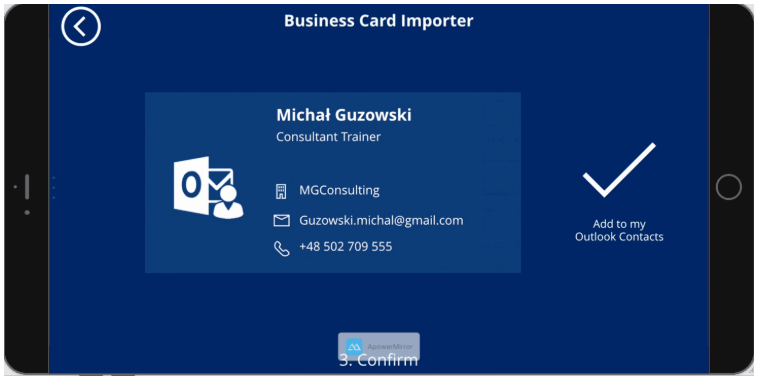
Styled confirmation screen
Styled confirmation screen makes that every time I confirm new contact I’m smiling. Seriously. No joke. It feels like all code logic in designed to be transparent for a user. No hidden catches, back-end formulas and processing that results in user’s “WTF?!” when he confront app results with his expectations. As a developer I know that there is nothing happening to business card contact fields values and confirmation screen is overhead. But as a user it’s just nice to be able to make sure what will be imported to my outlook contacts. Do you agree with me?
Download my solution
Feel free to download my solution. When you’ll install it you should have 1 PowerApp, 2 Flows and 2 additional connectors.
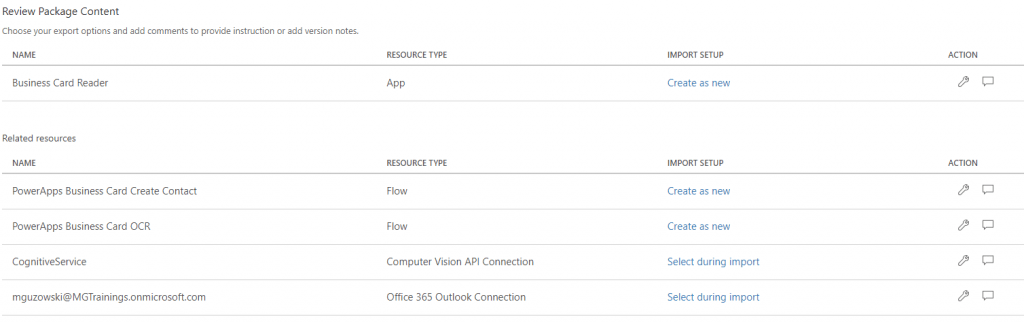
Remember to configure connectors and be aware that for Cognitive Service you’ll need Azure subscription with set up Cognitive Service resource. To sign up for cognitive service read this documentation section.
And that’s it! I hope you enjoy this post. Let me know if you like it or have any questions!