
(ESTIMATION TIME: 22 MINUTES)
In this post, I’m going to shed some light on the topic of animation in PowerApps. Animation is what probably most of PowerApps devs have never tried to use in their application and you may also think now: “That’s true, because hey, why should they? PowerApps platform is for business, not games”. So let me give you a couple of examples:
- Mastering timer control – Timer control is heavily used in animations but you can also use it in different ways like app behavior delays (change screen after 5 seconds), counters (time limited surveys) and statistics (time per page)
- Awesome loading screen or eye catchy busy indicator – just to amuse your users
- Improve your business apps – sometimes simple highlight or
animated illustration can really improve UX of your solution - Understand PowerApps platform even better – animations exists on cross line between possibilities and performance
- Cool games – because a kid is inside each of us
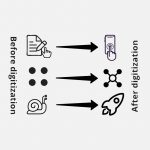
- Inspire yourself – any learning create a “dots” in your mind. Every idea is a connections of different dots all together but you never know when a new dot make a real difference. So collect them to not narrow your options
From my experience, playing with PowerApps animations significantly improved my proficiency in programming in declarative paradigm language (I have C# programming backgrounds which is an imperative paradigm language), helped in the understanding what and how I can implement in PowerApps, and also boost my confidence in my PowerApps skills.
DISCLAIMER:
This post was supposed to be much shorter. However the more I spent time on it the more I was convinced that showing the whole process without making shortcuts like “ok, we know what we want to achieve so here you have the final code and let’s briefly describe it” will give much more value to readers who come here not only to look for a solution but also to understand the process and learn. Furthermore, I did not split this article for a separate 2-3 post series because that will ruin the whole workflow and the context of work (What are we doing now? Why are we doing it? Hold on, I got to remind you the last part…?).
As the result, the following article stays in one piece bringing the most value of it, in my humble opinion.
Different ways of creating animation in PowerApps
To add an animation to your PowerApp app you can use different ways. You can:
- Add a video file – simple as that. In PowerApps you can switch controls off and auto play it so for a user it will look just like an animation. However be aware that if your video contains any sound you cannot autoplay it in Chrome. Also video cannot interact with user or react on screen changes. Like below:
- Add a gif file – this method is really similar to a video file without a sounds and is also limited in how it can interact with user or other controls. However it’s ideal for i.e. busy indicator.
- Constrain timer, controls (i.e. images) with functions – this method is the most powerful, interactable and flexible but also the one that needs some knowledge about animations, programming and platform specifics (like functions in PowerApps) for which you want to create an animation.
In this blog post, I want to focus only on the last of the above list.
Briefly about animation
Before we start with animation implementation in PowerApps it’s good to know what the animation really is. Especially that no matter which platform you pick the main concepts are always the same.
So what is animation? The short answer may be not really helpful: it’s a short sequence of a film. So what film is it? To understand that let’s go back to 1872 when there was an ongoing debate among people interested in horses: “whether all four feet of a horse were off the ground at the same time while trotting?”. Today you will probably google that or just record a horse with your mobile and play video really slow (or should I say frame by frame…but let’s not overtake the facts 😉 ) but back then common opinion was that horse has always at least one foot on the ground while at a trot (and this belief shared most paint artists that time). Anyway, one of the race-horse owners named Leland Stanford wanted to end the debate once for all and felt that relatively young and still imperfect technology, photography, might help him. So that he hired Eadweard Muybridge – 38 years old immigrant from England who was world-famous for his large photographs of Yosemite Valley – for some photographic studies. Muybridge began to experiment with an array of 12 cameras photographing a galloping horse in a sequence of shots. Those shots were far from perfect but one negative proved that trotting horse is fully airborne. In 1878 Muybridge published 12 frames of the trotting horse:

Once you quickly display pictures one by one (like in a flipbook animation) you will see something like this (frame 12 is not used).

To summarize all the above: animation is a picture change in time. This brings us towards conclusion we need if we want to make an animation:
- a pictures of the object in different positions
- a timer to “animate” (quickly change displayed pictures)
And commonly that will be it if we want to make an animation.
– “Em…so now I have to take picture of my airplane image in each position on the screen and animate it using a timer? Wow, that will be a number!” – of course not, this would be insane :D. Fortunately in computer programming, there are many situations where actually you can use only 1 picture, and on timer tick (smallest portion of time in which timer counts the time) simulates specific behavior of the image (like movement, rotation, size, etc) by modifying image properties using functions. And this is exactly what we’re going to use:
- single image
- a timer
- functions to compute property values (describe relations)
Create an app with animated airplanes
If you don’t know where to start it’s always good to break down your task into smaller steps. Do it until you will know how to do the task.
- Create an app with animated airplanes
- Add screen
- Add header
- Add Reset & Start/Stop controls
- Add board for airplanes
- Add airplane animation
- Add image
- Make airplane “fly”
- Move plane down the board
- Bounce plane from board boarders
- Move plane nose towards its direction
- Add speed control
- Add rotation on U-turns
- Add screen
I hope it makes sense but if you think the list should look differently just remember – that’s fine. The final result is what matters – not the path you follow.
Adding screen and its components
This task along with its sub-tasks is pretty straightforward. For the header, we use a simple label. Next for controls, we use buttons: the reset button will put all components to their starting positions, and the start&stop button will animate our objects. For the animation board, I used a rectangle shape just with blue borders and white filling (transparent filling is also ok).
Because for now, we don’t need to put any logic inside controls, I think a simple screen will be enough for you to implement this part of our demo app.

Add airplane animation
Add image
This will be the object that we’ll animate. The easiest way is to google some .png icon that is free to use (I used the icon from here and rotate it in paint.net to face it upwards) and import it to app assets.

To your app screen, an image control (1) and point added file in Image property of the control (2)

Make airplane “fly”
By “flying” I mean moving back and forth bouncing from board edges. And as it has been already mentioned in the “Different ways of creating animation in PowerApps” section move is a defined change in time. And there are 2 ways of achieving that: imperative-alike and declarative-alike. For now, don’t bother that, I’ll explain it later, what is important now is that we’ll start with an imperative-alike way. Reason: this was a natural way of implementing dependent logic for me since at the beginning of my professional career I was starting as C# developer.
So what we need is a timer that will produce ticks. Each tick triggers a change for a registered object by calling its update function. In PowerApps for update function, we’ll use OnSelect() event and this approach has 2 main advantages:
- Execution of object’s OnSelect() event can be done by using Select(<object>) function
- Debugging of an object on-tick behavior cannot be simpler – by clicking on an object with your mouse button (or finger) you can fire OnSelect() event
So without further hesitation let’s get back to PowerApps.
- Add a timer (I replaced Start/Stop button) and configure it in following way:
- Duration: 50 – This means that between each tick (a “frame”) 50ms pass which gives 20fps. Unfortunately this is the minimal value for timer ticks which limits the smoothness of our animation. Why limits? Because, as popular opinion says, human eye sees ~30fps which is equivalent to 33.3ms per timer tick (on the margin: I’ve found here an opinion that 50% of the population can see in 45+ FPS and trained fighter pilots can even see in 255 frames per seconds. I found no serious research that will prove that opinion except this reasearch from Uppsala University that only concludes “The minimum acceptable framerates is 60 frames per second”)
- Repeat: true – this provides repeating nature of the timer ticks
- Auto start: false – we’ll control that using our buttons
- Auto pause: true – just to switch off timer in case of navigation to another screen if any
- OnTimerEnd – see below code snippet. I use it as objects register
Select(imgPlane)
As I mentioned: the whole logic of airplane move and bounce will be placed inside OnSelect() function. Let’s start with something simple:
//object properties
Set(Vspeed,30);
//move behaviour
Set(planeY,planeY+Vspeed)
I hope the above code is self-explanatory but just in case:
- Vspeed is vertical change in position of our plane
- planeY stores plane Y position. Of course to make it work we also need to put placeY variable in imgPlane.Y property value
Once you hit “Play” your plane should start falling like this:
WOOHOO! That’s one small code step for us, one giant leap for our animation skills :). As you can see our plane is now moving downwards and disappears under the screen bottom.
To restart animation (place plane in starting position) add the below code to reset button OnSelect code:
Set(planeY,BoardBorders.Y);Ok, now let’s move to the next part: “Bounce plane from board borders”. Here small math part comes to play – in every tick, we’ll check if the top/bottom border of the plane image is above/under the board border.
First, let’s mark plane nose direction PDirection. For its value I’m using a number (0 = up, 90 = right, 180 = down, 270 = left) so it will be easier to make all the direction and rotation checks later on. Depends on the plane’s direction we will add or subtract VSpeed:
//we substract to fly up and add to fly down because Y-axis is inverted relative to the Cartesian axis
If(PDirection=0,
Set(P1Y,P1Y-Vspeed),
Set(P1Y,P1Y+Vspeed));
//if we're flying top and cross the top boarder -> go down
If(PDirection = 0&&planeY<=BoardBorders.Y,Set(PDirection,180));
//if we're flying down and cross the bottom boarder -> go up.
If(PDirection = 180&&planeY+imgPlane.Height>=BoardBorders.Y+BoardBorders.Height,Set(PDirection,0))
Probably you will see an error – PDirection hasn’t been initialized. Add following code line to Reset button OnClick
Set(PDirection,0)Play the animation. Your plane should bounce now!
Looks quite good but can you see something awkward? See how the tail (for some configurations it may be the nose or both) pass the border before the plane change its direction?
Any ideas what is causing that?
Give yourself a minute and try to answer this question by yourself.
Answer: This happens because we have STATIC VSpeed and always check for the borders collision after making the step. If we would like to keep the animation speed the best way will change VSpeed if the expected step will cross the borders and if so reduce it to the maximum border distance. Equivalent code can look like below:
//Near-edge behaviour
Set(Dist2Top, planeY-BoardBorders.Y);
Set(Dist2Bottom, BoardBorders.Y+BoardBorders.Height-planeY-imgPlane.Height);
If(PDirection=180, Set(VSpeed,Min(VSpeed,Dist2Bottom)),
PDirection=0, Set(VSpeed,Min(VSpeed,Dist2Top)));
Now the bouncing should looks as it should.
Your imgPlane OnSelect() function should be similar to below (notice I’ve refactored Bounce behavior code a bit):
Set(VSpeed,30);

//Near-edge behaviour
Set(Dist2Top, planeY-BoardBorders.Y);
Set(Dist2Bottom, BoardBorders.Y+BoardBorders.Height-planeY-imgPlane.Height);
If(PDirection=180, Set(VSpeed,Min(VSpeed,Dist2Bottom)),
PDirection=0, Set(VSpeed,Min(VSpeed,Dist2Top)));

//Move behaviour
If(PDirection=0,
Set(planeY,planeY-VSpeed),
Set(planeY,planeY+VSpeed));

//Bounce behavior
If(Dist2Top = 0,Set(PDirection,180));
If(Dist2Bottom = 0,Set(PDirection,0))
The last part of this sub-task is to make the plane’s nose point in the direction plane is flight. To do that we make use of an image property called ImageRotation

Result:

Add speed control
For speed control, I use slider control but of course, you can use whatever you like: number text field, rate control, or even text recognition property of the pen input field ;). PowerApps is very flexible and so you should be.
To add slider control select Controls > Slider

Integrating our new shiny control with our plane will be unexpectedly easy. Modify the first line of imgPlane OnSelect() function to this (SpeedSlider is the name of my slider):
Set(VSpeed,SpeedSlider.Value);Play with it to test it and to congratulate yourself. You’ve just done a piece of a good job. Well done!

You deserve a break, use it: fresh your mind, eat some peanuts (good for your brain) and once you are ready come back to continue the animation project – there is still some work to be done.
Add rotation on U-turns
So far what we did is the simple animation of a plane flying up and down. However, adding a u-turn once a plane reach borders requires making some changes to what we’ve done. Because you see – how to rotate the image in PowerApps? My first thought was to use the ImageRotation property. But unfortunately, ImageRotation accepts only ImageRotation enum object that has 4 flags: None, Rotate90, Rotate180, Rotate270. Auch 🙁
Using gif or video controls slipped through my mind but I quickly kill those ideas – I wanted to have control over the rotation speed of the plane which both controls cannot provide.
Using pure math to compute the movement of the image by the circle was also not an option because it will only simulate the movement and not the rotation.
Finally (why the best ideas are always the last ones?) I thought that maybe I can use HTML control with img tag in it and rotate the image using HTML and CSS manipulation.
But before we start implementing, let’s plan our work – it’s very important to follow the plan.
- Add HTML plane img to screen
- Change plane rotation manually just to understand html/css rotation logic
- Add rotation logic to the plane OnSelect()
Step 1: Add HTML plane img to screen
Click Text > HTML Text

Set its paddings to zero, size to 80 x 80 (I want the image to be of that size and also that the size of the whole control was the same as the size of the image), and in HTMLText property write the following code:
"<Img src='<your img URL here>' style='width:80px;height:80px;'>"Please note that not every kind of URL you can put as <your img URL here>. For the src attribute value of the Img tag in HTML Text control remember the following:
- Provide absolute URL to your resource
- resource must be publicly accessible
- Redirections are not supported
- Authentication is supported
Below URLs WON’T work:
- appres://resources/plane-icon
- https://contoso.sharepoint.com/:w:/g/SADQWEDRmfJIh5AdjoFBgWoBV9pJ_uvIX-3Vw2Ag8y90Mw?e=fTuaxu
Below URLs WILL work:
- https://contoso.pl/wp-content/images/plane-icon.png
- https://contoso.sharepoint.com/SiteAssets/plane-icon.png
If you put proper URL for your img you should see something like this

To remove a slider that you can see on the right side of the HTML Text control just add to style attribute “position:absolute”
"<Img src='https://mgtrainings.sharepoint.com/SiteAssets/plane-icon.png' style='width:80px;height:80px;position:absolute;'>"Step 2: Change plane rotation manually just to understand HTML/CSS rotation logic
We have our HTML Text control that displays image but how to rotate it. In CSS there is a property called transform that allows for rotating, skewing, and scaling the object. Let’s try something simple now and make our image to rotate 90 degrees:

Hm, that is some progress but as you can see the image rotates relative to its center. We will deal with that in a second but first, let’s take care of one more thing – make the rotation dependent on a variable value.
To do that we want to break the HTML code string in the place of degrees numeric value and replace that numeric value with our variable. Following code shows how to do it:
"<Img src='https://mgtrainings.sharepoint.com/SiteAssets/plane-icon.png' style='width:80px;height:80px;position:absolute;transform: rotate("&PRotation&"deg)'>"Remember to initialize PRotation variable (using Set() function ie. in the Reset button). In the below gif, you can see the plane rotation dependent on a slider value.

Now we can get back to the problem of rotation relative to the center of the image. What we want is that the airplane image moves by the circle and rotates accordingly to its position relative to the center of that circle path. One way will be to use mathematical formulas for movement computations. Although it should be absolutely achievable, the synchronization of the movement and rotation sounds like juggling with too many balls at the same time to me. I don’t want to stick in one problem for days – at least not for now :). Is there another way of solving that problem? Of course, there is and once again we can use CSS for that!
In CSS there is another cool property called transform-origin which moves the center relative to which the rotation will take place. We want the rotation to take place relative to the end of the right wing of the plane. Let’s implement the below code and observe outcomes
"<Img src='https://mgtrainings.sharepoint.com/SiteAssets/plane-icon.png' style='width:80px;height:80px;position:absolute;transform: rotate("&PRotation&"deg);transform-origin: right'>"
Ah, rotation is happening but our plane moves off the HTML Text control borders. Let’s change its size to 160 x 160 (double the size of the image)

Hmm, not bad, but the plane still disappears above the top border. So let’s move it away from the top border by 40px (half of its size)
"<Img src='https://mgtrainings.sharepoint.com/SiteAssets/plane-icon.png' style='width:80px;height:80px;position:absolute;transform: rotate("&PRotation&"deg);transform-origin: right;top:40px'>"
GREAT! Now it’s rotating! Perfec…oh, hold on a second. See how tips of the wings are cut off by HTML Text control borders on rotation?

Do you have any idea why it’s happening? Think for a second before continue reading.
Ready?
So this cutting-off happens because of the relation between the square-shaped image, the center of the circle path, and its radius. The easiest form of explanation will draw these relations:
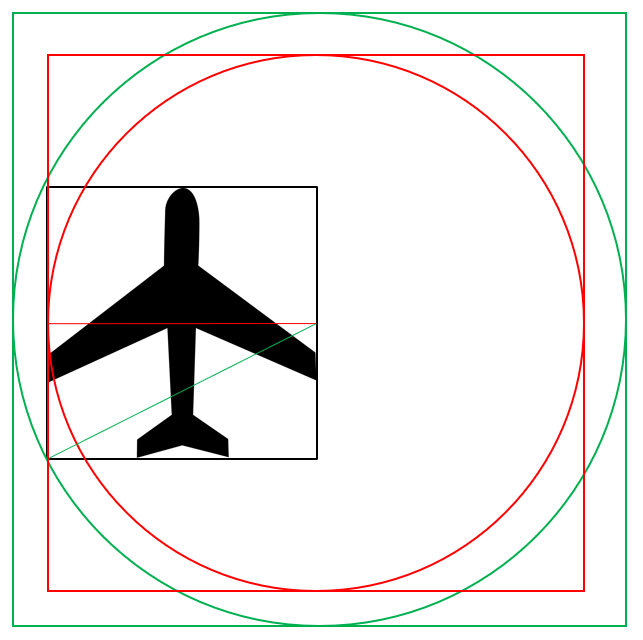
The red square is double the size of the plane image and illustrated the HTML Text control borders we have currently implemented. The red circle radius indicates the most far point of the image that will be visible at any time of the rotation. You can clearly see the cutting there on the tip of the wing of the plane. In such a situation ideally will be to enlarge HTML Text size up to the green square size (math formula: a*sqrt(5)/2, where ‘a’ is the size of the side of the square). However, in our case, we need only a few more pixels. So let’s do the following:
- Add 5px padding on each side of the HTML Text control
- Add 10px to the HTML Text control width (170 now)
- Add 10px to the img style property (top:50px)
- Add 20px to the HTML Text control height (180 now)
Result:

HAHA! Awesome! Now take a break, go run, eat some fruits and come back. The last part of the animation development process is ahead!
Step 3: Add rotation logic to the plane OnSelect()
Now we need to combine the above rotation animation with the whole plain movement.
Open up your plane’s OnSelect() function to remind you of its logic: near-edge behavior, move and bounce logic. Now we want the following changes to take place:
- when plane hits border stop moving and start rotation procedure
- Until the plane makes 180 rotation total do the following:
- don’t move (of course)
- rotate for a value of SpeedSlider
- stop rotating once reach 180 degrees or 360 (watch out for unwanted crossover – don’t repeat the mistake from movement logic. Learn 🙂 )
- Continue movement
Changes in the code we’ll begin from creating rotation logic. It will be very similar to the move logic so the only lines that require explanation are the second line and the last one. Add below code right after the first line of code where you set VSpeed variable.
Set(Rspeed,SpeedSlider.Value);
If(isRotating&&Mod(PRotation,180)<>0,
//ROTATION
//Protection from crossing over the full U-turn
Set(Rspeed,Min(180-Mod(PRotation,180),Rspeed));
//Rotate
Set(PRotation,PRotation+Rspeed),
//Continue movement
Set(isRotating,false));
Variable named isRotating is a flag that indicates if the plane is rotating or not. If it’s ‘true’ it’ll keep rotating. Once we finish rotation we set our flag to ‘false’. How do we know when we finish? This is why
Mod(PRotation,180)<>0 condition is for. Function Mod returns the remainder after a number is divided by a divisor. If the PRotation value equals 180 or its multiplications, the function will return 0 and the condition will be false. With one simple function, we cover 2 u-turns. I like such code 🙂
All the remaining code we can safely put inside If(!isRotating,(…)) block.
If(!isRotating,
Set(Dist2Top, planeY-BoardBorders.Y);
Set(Dist2Bottom, BoardBorders.Y+BoardBorders.Height-planeY-imgPlane.Height);
//Near-edge behaviour
If(PDirection=180, Set(VSpeed,Min(VSpeed,Dist2Bottom)),
PDirection=0, Set(VSpeed,Min(VSpeed,Dist2Top)));
//Move
If(PDirection=0,
Set(planeY,planeY-VSpeed),
Set(planeY,planeY+VSpeed));
//Bounce behavior
If(Dist2Top = 0,Set(PDirection,180));
If(Dist2Bottom = 0,Set(PDirection,0)))
You may ask yourself now – “why didn’t we just throw away this isRotating variable and just put the whole move logic on the false result of the first if condition (in the place of where Set(isRotating,false) line is)?”. We can! But for the cost of code readability in my opinion. I like to keep code that is self-explanatory to me or someone else to understand it even after months of not reading it. From my perspective comments are not always enough and such flags (and extra if conditions) perfectly do the job. But of course – do as you like :).
The last thing that is left is to adjust bounce behavior. We need to set isRotating flag and give a plane the first rotation push (otherwise Mod(PRotation,180)<>0 will never be true). Swap the last 2 lines of your code as follow:
If(Dist2Top = 0 && PDirection = 0,Set(PDirection,180);Set(isRotating,true);Set(PRotation,PRotation+Rspeed));
If(Dist2Bottom=0&&PDirection = 180,Set(PDirection,0);Set(isRotating,true);Set(PRotation,PRotation+Rspeed)))
The “&& PDirection = 0” extra condition is to secure our plane from entering If block twice – when the rotation start and just after it ends (when the plane should continue moving forward).
Your whole code should look similar to this:
Set(VSpeed,SpeedSlider.Value);
Set(Rspeed,SpeedSlider.Value);

If(isRotating&&Mod(PRotation,180)<>0,
//ROTATION
//Protection from crossing over the full U-turn
Set(Rspeed,Min(180-Mod(PRotation,180),Rspeed));
//Rotate
Set(PRotation,PRotation+Rspeed),
//Continue movement
Set(isRotating,false));

//MOVEMENT

If(!isRotating,
Set(Dist2Top, planeY-BoardBorders.Y);
Set(Dist2Bottom, BoardBorders.Y+BoardBorders.Height-planeY-imgPlane.Height);
//Near-edge behaviour
If(PDirection=180, Set(VSpeed,Min(VSpeed,Dist2Bottom)),
PDirection=0, Set(VSpeed,Min(VSpeed,Dist2Top)));
//Move
If(PDirection=0,
Set(planeY,planeY-VSpeed),
Set(planeY,planeY+VSpeed));
//Bounce behavior
If(Dist2Top = 0&&PDirection = 0,Set(PDirection,180);Set(isRotating,true);Set(PRotation,PRotation+Rspeed));
If(Dist2Bottom=0&&PDirection = 180,Set(PDirection,0);Set(isRotating,true);Set(PRotation,PRotation+Rspeed)))
WOW! That was a hell of the road but we made it! You made it! If you follow all the steps up to here I’m really really thankful and proud of you. You are awesome!

Pssst…Have you heard about the 👉www.Developico.com👈?![]()

 These Power Platform experts can help you out!

![]()
Here you can download my project with finished planes animation with some extras! I’ve added a screen with multiple planes and a movable border-bottom border. When you play it and start to move the bottom border you’ll observe interesting thing – an animation slows down and sometimes even lag spikes

If you have enough energy you can read the next section…or just read it later 🙂
Performance in animations
So you probably already know that PowerApps is using declarative code. Declarative means that the code expects results instead of giving instructions (orders) of how to do something (this is imperative). But I feel that in PowerApps declarative also means that it doesn’t really like a controller alike pattern where one object activates another object(s) (like we did in timer control which selects plane on timer end).
I’ve googled a bit looking for some solution and found this video where Brian (a.k.a. @8bitclassroom) built a simple animation of shooting space ship. He used an observer pattern where each projectile object (kept in gallery) has its own timer and object behavior depends on it in a way like projectile Y property uses timer.value/timer.duration for its position calculations. So I’ve built a copy of his approach and must admit that his method was very effective and even tens of shots did not slow down the whole animation (note that no object is removing once reach the top)
Oh, as a side note – feel free to download also this app with a comparison from here.
To verify my theory I’ve built the same app but this time I use my method (each projectile was a gallery item and each item has its own timer and image. On every timer end the projectile was selected). Additionally, once the projectile reaches the top I removed it from the collection so I can be sure that it’s not the ongoing timer that is slowing down animation. And as you can see my app is still lag spiking

Taking 20 shots comparison

You can clearly see that’s even though the total number of shots in my method is smaller the animation is still slowing down. It must be the Select() method and the architecture of my app where one object calls another.
So how to fix the plane animation app? Honestly – I’m not really sure. You see, declarative dependency for projectiles is generally easy to do – one direction, straight line, simple computation. Unfortunately, when the looping movement comes to play, especially with u-turns I feel a bit confused about how to implement that. Put all the code in the Y property function? Then how/where to set the rotation value?
If you have any idea please share it in the comments below – I will gladly check it.
Phew, I know, this was a loooong blog post. Nevertheless, I hope you enjoyed it, took your value from it, learn something new, and now know PowerApps even better!
Have a great day and happy PowerApps coding 🙂

Such a great and thorough post surely deserves at least one comment. WELL DONE, Michael!
Thanks for taking the time to walk us through the learning process of animation in Power Apps. I plan to use this knowledge to build transition effects of screen overlay-like objects (versus having to load entirely separate screens). Thanks again
Ha, thank you so much, Jim! TBH there were a lot more comments but they were on Disqus…which I decided to swap with built-in WordPress comments. (Disqus declares that their comments are also kept in WordPress DB but as we can see – they’re not. And that’s why I won’t use them anymore).
P.S.
Looking forward to your plans! You can also check out how I did similar transition effects here: https://michalguzowski.pl/delegation-learning-app/
Great article, it’s really neat to see people do inventive stuff…By Chance, how would you stop the timer on Hover? Weather that is a hover over a gallery, button, or images. If I wanted the image freeze upon hovering over it – how would that be achieved?
on hover you can change the variable that is observed by a timer. Have you tried that?